Integrating Skin Deposits: an API Walkthrough

hunbenji
AssetPay team ·
How to accept CS2 skins as payment covers whether skin deposits are worth adding and what a gateway does for you. This is the other half: what the integration actually looks like in code. By the end of it you'll have a user authenticated, their priced inventory on screen, a deposit created, and a webhook handler that credits their balance — with signatures verified properly.
Everything below uses the real AssetPay API. The payloads are the ones the API reference documents, not simplified sketches, so you can paste them into an HTTP client and go. The full walkthrough with every field lives in the quickstart; this post is the annotated version.
Building on Node.js? The official TypeScript SDK, @assetpay/assetpay-sdk, wraps every step below: it mints and refreshes the client token, retries without ever creating a second deposit, and verifies the webhook in one call. This walkthrough stays on raw HTTP so it reads the same in any language.
The shape of the whole thing
AssetPay has two integration surfaces, and picking the right one is the first decision:
- Client mode — your backend exchanges a user's identity for a short-lived client token, and that token drives the user-facing endpoints: inventory, market, deposits, withdrawals. This is the whitelabel checkout path: the user experience is entirely yours, AssetPay is invisible.
- Self mode — server-to-server endpoints authenticated with your API key alone, where trades run against a Steam trade URL you supply. Useful for treasury operations and for platforms that already have their own item-selection UI.
This guide builds the client-mode deposit flow, because it's what most platforms ship first. The sequence:
- Your server authenticates the user and gets a client token.
- You show the user their inventory, already priced.
- The user picks items; you create the deposit.
- AssetPay's bot sends the trade offer; the user confirms it in the Steam mobile app.
- Your webhook endpoint receives signed state changes and credits the balance on
completed.
Before you start
You need three things from the merchant dashboard: an API key (sent as an api-key header, prefixed ap_, with the CORE_ACCESS scope), your API secret (used to verify webhook signatures — never sent over the wire), and a configured callback URL. The base URL for the API is in the docs; the examples below read it from ASSETPAY_API.
One convention to know before the first request: every response, success or error, arrives in the same envelope.
{
  "requestId": "550e8400-e29b-41d4-a716-446655440000",
  "success": true,
  "data": {}
}
On failure success is false and an error object carries a numeric code, a stable key like VALIDATION_FAILED, and a human-readable message. Log the requestId on every call — it's the fastest way to get a specific request looked at.
Step 1 — authenticate your user
When a user opens your deposit page, your backend trades their identity for a client token:
const res = await fetch(`${process.env.ASSETPAY_API}/auth/authenticate-client`, {
  method: 'POST',
  headers: {
    'api-key': process.env.ASSETPAY_API_KEY,
    'content-type': 'application/json',
  },
  body: JSON.stringify({
    clientSteamId: user.steamId,        // "76561198012345678"
    clientTradeUrl: user.tradeUrl,      // their Steam trade URL
    clientId: user.id,                  // YOUR user id — comes back on every trade
  }),
});
const { data } = await res.json();
// data.token — JWT, valid 24 hours
The optional clientData object on this request (totalWager, kycLevel, fiatDeposits, cryptoDeposits) lets you attach risk context to the session — worth wiring from day one if you'll ever want different limits for different user tiers.
Two practical notes. First, validate trade URLs at signup rather than at deposit time — POST /secure/check-tradeurl exists exactly for that, and a bad trade URL discovered mid-checkout is a lost deposit. Second, the client token is what your frontend uses for the calls that follow, passed as the Authorization header.
Step 2 — show the inventory
const inv = await fetch(`${process.env.ASSETPAY_API}/client/inventory`, {
  headers: { authorization: clientToken },
});
The response is the user's Steam inventory with prices already attached — each tradable item carries an itemId and the price AssetPay will honour for it. You render it, the user picks. There is no separate "get a quote" step: the price you display is the price you commit in the next call. Where those prices come from, and why they aren't just the Steam Community Market number, is its own topic — see how CS2 skin pricing works.
Step 3 — create the deposit
const res = await fetch(`${process.env.ASSETPAY_API}/client/trading/deposit`, {
  method: 'POST',
  headers: { authorization: clientToken, 'content-type': 'application/json' },
  body: JSON.stringify({
    items: [{ itemId: 'a1b2c3d4-e5f6-7890-abcd-ef1234567890', price: 10.75 }],
    game: '730',                 // "730" = CS2, "252490" = Rust
    externalId: 'dep_unique_123',
    isInstant: true,
  }),
});
externalId is your identifier, and it matters more than it looks: it's how you correlate webhooks with your own records, it's how you re-fetch a trade later (GET /secure/trades filters by it), and it's your idempotency handle — generate it before the request, store it with the pending deposit, and a retry can never create a double credit.
The response is a trade object in status: "initiated". From here AssetPay's bot sends the trade offer, and the user confirms it in the Steam mobile app — which every trading user already has, because accounts without the Steam Mobile Authenticator sit behind 15-day trade holds.
Step 4 — the webhook handler, done properly
Every state change lands on your callback URL as an HTTP POST. This is the part of the integration where correctness actually pays, so it deserves the most care.
Each delivery carries a signature header:
X-AssetPay-Signature: t=2026-03-11T10:00:00.000Z,id=<delivery-id>,s=<hex-signature>The signature is HMAC-SHA256 over the string <deliveryId>.<timestamp>.<rawBody>, keyed with your API secret. The single most common webhook bug in the wild: verifying against re-serialized JSON. You must compute the HMAC over the raw request bytes — JSON.parse followed by JSON.stringify reorders nothing in theory and everything in practice.
import crypto from 'node:crypto';
import express from 'express';

const app = express();

app.post(
  '/webhooks/assetpay',
  express.raw({ type: 'application/json' }), // raw bytes, not express.json()
  (req, res) => {
    const header = req.get('X-AssetPay-Signature') ?? '';
    const { t, id, s } = Object.fromEntries(
      header.split(',').map((part) => part.split('=') as [string, string]),
    );

    const expected = crypto
      .createHmac('sha256', process.env.ASSETPAY_SECRET)
      .update(`${id}.${t}.${req.body.toString('utf8')}`)
      .digest('hex');

    const valid =
      s?.length === expected.length &&
      crypto.timingSafeEqual(Buffer.from(s, 'hex'), Buffer.from(expected, 'hex')) &&
      Math.abs(Date.now() - Date.parse(t)) < 5 * 60 * 1000; // replay window

    if (!valid) return res.status(401).end();

    const { trade } = JSON.parse(req.body.toString('utf8'));
    // ... handle trade.status, then:
    res.status(200).end();
  },
);
Use timingSafeEqual rather than === for the comparison, and reject timestamps older than a few minutes — both are cheap insurance against replay and timing games.
In Node.js, verifyWebhook from @assetpay/assetpay-sdk/webhooks does all of the above, accepts both secrets while you rotate one, and tells withdrawal approvals apart from ordinary events. The SDK page has the full handler.
Respond 200 within 15 seconds. If your endpoint is down, deliveries retry — 11 attempts on a backoff schedule stretching to roughly fourteen hours — so a deploy window won't lose you a settlement. An endpoint that fails continuously for 72 hours gets disabled, and at that point you reconcile by polling GET /secure/trades with your stored externalIds.
The statuses your handler must know
There's no separate event name — the event is the trade's new status:
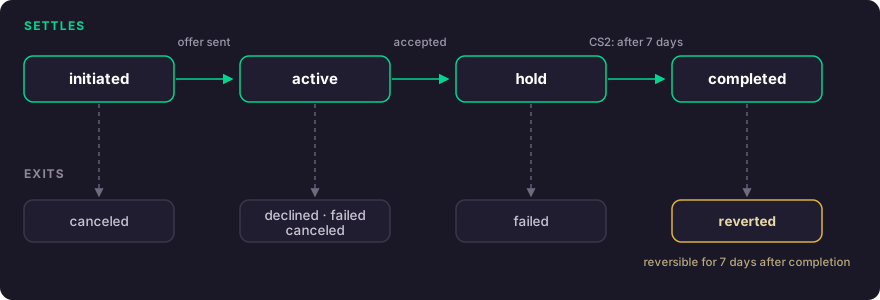
| Status | Meaning | Your handler |
|---|---|---|
initiated | Trade created, offer not yet accepted | Mark pending |
active | Offer in progress | Nothing yet |
hold | Items caught by a trade restriction | Wait — see below |
completed | Items received and verified | Credit the balance |
failed / canceled / declined | Terminal, nothing moved | Release the pending record |
reverted | A completed trade was rolled back | Debit what you credited |
Two of these deserve respect. hold exists because Steam applies restriction windows to items and accounts — the mechanics are in Steam trade holds and trade locks. And reverted exists because CS2's trade protection added a reversal window after delivery: a deposit that completed can un-complete. This is why callback payloads carry totalPrice, preCredit, and pendingCredit — so your ledger can distinguish value that is spendable now from value still inside a protection window. The exact split rules are in the instant credit guide; the design consequence for you is one sentence: credit spendable and pending balance separately, and never let pending value leave the platform.
Self mode, briefly
If you'd rather keep everything server-side, POST /secure/sell is the deposit equivalent: same items, game, externalId fields, plus a tradeUrl for the account being traded with, authenticated by API key alone. Withdrawals mirror it with POST /secure/buy. The withdrawal side has its own moving parts — an approval callback that lets you reject a cashout before it executes, quick-buy for sourcing, delivery states — covered in instant skin cashouts for gaming platforms.
Frequently asked questions
How long does the whole integration take?
The deposit path above is a day of honest work for one backend engineer, most of it in the webhook handler and your own ledger writes. The Steam-facing machinery — bots, CS2 item pricing, offer lifecycle, retries — is the part you're specifically not building; that's the point of a gateway.
What does my frontend talk to — AssetPay or my backend?
Either works. The client token is scoped to one user and expires in 24 hours, so exposing it to your frontend is by design; platforms that want every call server-side proxy the client endpoints instead. Keep the API key and the webhook secret strictly server-side either way.
Which games can users deposit from?
CS2 (game: "730") and Rust (game: "252490"). The Rust economy behaves differently enough to have its own guide.
Do I need to handle Steam being down?
Not directly — offer retries and bot failover happen on the gateway side. What you see is honest statuses: a trade stuck in active longer than usual during a Steam outage, then a terminal state. Build your UI copy for "this can take a few minutes" and you've handled it.
The quickstart has the same flow with every endpoint's full schema, and the team is on Discord when you hit the first weird edge case. They all have weird edge cases; skins are like that.